 |
| Manufacturers |
| RaM List |
| Atomic Bombs |
| R-1 Missile |
| Sanger |
| Hs 117 Schmetterling |
| V-1 |
| V-2 |
| V-2 Manned |
| V-2
Support |
| Wasserfall |
| V-7
Feuerball |
| Home |
Special Hobby - 1/72 Plastic
SAMI - Jan'98
The Kit
Originating as the Czech Condor A4/V2 kit, this derivative consists of simple, but nicely detailed parts with recessed panel lines where relevant. Essentially there are two halves to the rocket and tail unit (or should it he fins?), a clear cockpit cover and a "Startplatform" or launching base. This latter structure forms a simple mounting base, the parts of which lack a degree of crispness in their moulding. The rocket assembly comprises twenty two parts, the launching platform comprising the remainder. Despite the box lid notation to the contrary, no photo-etched part are included. I'm uncertain in any event what they could possibly have been.
Instructions
In keeping with the same manufacturer's A9 kit (see Vol 3, Iss 12, Page 746), the instructions are printed on both sides of an A4 sheet which gives the basic historical data, a plan layout of the kit contents, subasscmbly diagrams, a two-view plan, RLM colour scheme and decal placements.
Construction
The actual rocket's main assembly is a simple and speedy operation comprising a spartan cockpit unit, stub wings and a little taill fin assembly. You may at this stage care to consider a degree of internal weighting of the tail unit area to guard against the rocket toppling off its base when on display. The base unit assembly is composed of a variety of small angled shapes and winding handles, but follow the instructions, take your time and all will be revealed .
Accuracy
I am unable to confirm the accuracy of this kit owing to a complete lack of information in my library, but it looks utterly convincing when assembled, one does wonder if this rocket was a potential Luftwaffe "Kamikaze" weapon.
Colour Options
The recommended and illustrated splinter pattern in RLM 76 (Hellblau), RLM 83 (Lichtgrun) and RLM 81 Braunviolelt look suitably Germanic. I added RLM 66 (Scharwzgrun) for the cockpit area which was visible. All colours were from the AeroMaster Acrylic range.
Decals
The decals are by Propagleam and include wing and body crosses, swastikas in opposing halves and two lengths of red warning lining which strangely I found to be a little too short. The white on the crosses fully obliterates the dark RLM 81 colouring. The carrier film although gossamer thin is very strong but can crinkle easily and needs careful "floating" into its location with plenty of Mi&roset and a watercolour brush. The result then is excellent with no silvering.
Decal Rating = 9/10
Conclusion & Recommendations
Yet another addition, seemingly without end, to that remarkable selection of Luftwaffe "probable" and "highly unlikely" aviation endeavours. Straightforward to assemble, quick to complete. The masking lor the painting of the splinter camouflage scheme was the most onerous and time consuming activity of all. Recommended for all modelling abilities.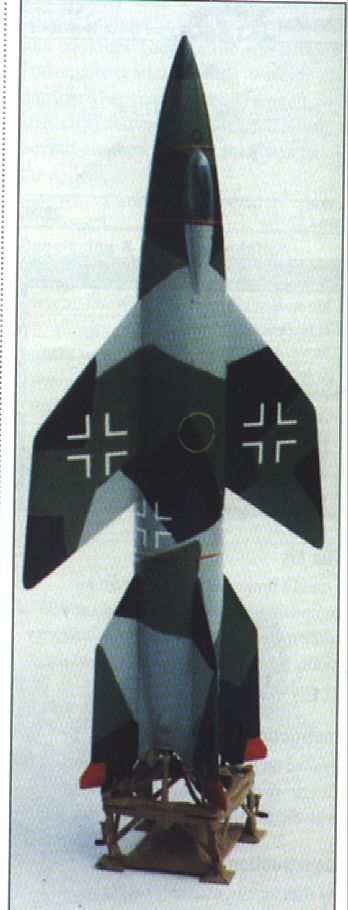 |
EMW A-9 Special Hobby
EMWA9 Special Hobby : 1/72nd Price: 9.95 Limited Run Injection Moulded -Hannants - SAMI - Dec '97 - Sydney Parker

The Kit
Towards the end of 1944 the Germans were considering the possibility of rocket attacks against the USA. Initially the idea of launching A4 type rockets from Class XXI submarines was investigated, but this idea was shelved as the more practical concept of an A9 rocket with an AlO booster was considered.
The A9 rocket was to be lifted to a height of 160Km by the AlO booster unit and then guided to the target by a chain of spaced out submarines. On nearing the target the pilot would catapult from the A9 rocket now travelling at around 2000 mph. There appears to be no record of a trial firing, certainly the career development of the pilot would seem to have been under some threat!
The kit does not contain any photo etched parts despite the box lid notation. The main parts comprise crisply detailed light grey plastic parts with the inevitably limited number of panels recessed. The model is made up of eighteen parts, the remainder forming a simple launching platform. A little flash is attached to all of the smaller items.
Instructions
A single A4 sheet with a numbered plan of the kit parts, brief historical notes, carefully annotated sub assembly drawings, a three-view drawing of the rocket and details of the RLM colours together with locations of the few decals.
Construction
Essentially assembly of the very basic cockpit comprising a floor, control column, seat and front and rear bulkheads. I suggest some weight placed in the tail area will ensure the rocket sitting more securely on its launching pad. Subsequently the completed rocket assembly is swift ad trouble free. The launch pad consists of several small parts but a little care and patience will ensure a satisfactory result.
Accuracy
This must be taken on trust. I have no records to show the exact dimensions of the A4(V2) rockets that dropped on the UK and these kits in any event are specialised variants, but certainly the completed model looks very convincing.
Colour Options
Once more, informed comment is not possible but the recommended colouring is overall RLM 76 (Lichtblau) with superimposed RLM 75 (Grauviolell) and specific areas to be in RLM 23 (red). I added RLM 66 (Schwartzgrau) for the little cockpit area visible. The launch pad is overall RLM 79 (Sand Yellow). All colours were from the AeroMaster acrylic range.
Decals
These are by Propagteam, so high quality is assured. They consist of wing and fuselage crosses, halves of swastikas which with coaxing will gel as single items, and some red warning stripping. All these images settle easily with Microset and silvering was not a serious problem.
Decal Rating =9/10
Conclusion/Recommendation
Yet another of the veritable flood of late war period experimental or proposed aeronautical weapons which fortunately were still proposed or experimental at the cease fire. No problems will be experienced during assembly and therefore I can recommend it for all skill levels.
Kit review of Special Hobby A4b and A9:- Mark Hernandez
These kits are 1:72 kits from Special Hobby. They are injection moulded with vacuform canopies. Both kits are concepts for piloted versions of the V2. Both kits are moulded in gray plastic and have a rough surface texture that will need to be sanded down. They have the same main tree and the second tree has the cockpit and wings or chines/strakes depending on which kit you get. There are 52-56 parts in the kit (A9-A4b) and 35 of them are for the launch platform alone! The decals are very nice and thin.
I decided to build both at the same time and it seemed that it should be a pretty straightforward build. But with Special Hobby kits you never know.
The cockpit is very basic: floor, front/rear bulkheads, seat and stick. You probably won't see much once the small canopy is installed but I decided to add a few things. I put in some side consoles and an instrument panel and just a few instruments on it. I used a control stick from a Cooper Details Me 262. The seat is very thick so I sanded the sides to thin it down and I added seat belts and harness from a Cooper Details set. I wanted to install the seat after the 2 body halves were together and sanded so I had to keep testing to make sure the seat would fit into the small cockpit opening, and it barely does. I also raised up the seat slightly off the cockpit floor so that the headrest would be near the very top of the canopy. Since there are no locating tabs for the cockpit make sure everything lines up.
The body halves have overflow ports moulded at the bottom of the body. These are represented by solid triangular-shaped mounds, which are not symmetrical. I did some carving and sanding to correct this then drilled the openings for them. According to pictures of the real thing in a museum one of the openings actually has a v-shape to it so I cut this open and added some plastic backing.
The A4b has trapezoidal wings. There are no locator pins for the wings but the instructions do give you a measurement from the nose back to the leading edge wing root in millimeters of where to install it. I first drew a line from the tip of the nose back to the leading edge of the tail fins to make sure the wings would line up correctly. I followed the instructions of where to mark the wings and marked the leading edge spot. I then put the wing up to the spot and marked the trailing edge spot. I then made a mark in the center of the two spots and on the same place on the wing. I then drilled the locator hole in the body and corresponding hole in the wing to attach brass wire to the wing. I followed the same procedure for the other side. I also drilled locating holes and pins for the two tail fins that need to be attached.
Both kits come with jet stream vanes, which, if you haven't seen a V2, are small rudders that are attached at the bottom portion of the rocket so that they protrude into the jet stream exhaust. I didn't like the kit ones because they look like a lump of plastic. So I scratch built my own. Before assembling the body halves I drilled small locating holes to attach these. These would be installed at the very end of the assembly process. Also most V2's had dipoles attached to the base of the tail fins. The beginning portions are molded on the kit fins and the instructions say to add 0.5-5mm wires to the ends of these. Again, I drilled small holes in the ends and will add the wires at the end of the assembly process.
The A9 has the chines/strakes from the nose all the way down to the tail incorporating the tail fins. I followed the same process as I did on the A4b but I also drilled an additional set of locating holes in the tail section to give another point of attachment and for strength. Since the A9 was to be the second stage to the A10 I opted to remove the molded on dipoles and also opted not to install the jet stream vanes. (I could always try to add them on later if I want to).
Before putting the two body halves together you have to do a little surgery on the A4b and A9.
On the A4b you need to remove the rudders on the tail fins. The A4b had enlarged rudders that are provided in the kit. This is a fairly simple process to remove just by cutting along the lines already provided from the kit, remove the old ones and then glue on the new ones.
On the A9 you don't have to cut them off but you do need to fill in some existing lines and scribe some new ones. The A9 has larger backward "L" shaped rudders. The tail fins on the strakes already have them. I scribed the 2 new lines on each side of the fins on the body halves and then filled in the old lines with super glue, hit it with accelerator and sanded it smooth.
For the main body the instructions don't say what to install first so I started with the jet exhaust cone. This part is not shown in the instructions for the A4b but it's there on the instructions for the A9. This part also doesn't fit very well and it's hard to tell just exactly how to fit it. Since there are, again, no locators and you just stick it in the bottom it seems to stick out too far from the bottom in my opinion. I ended up trimming it and thinning the inside portion of the body. That seems to look better. While the body halves were taped together I plopped it in and glued it to one side and set it aside to dry. Once that was dry I glued in the cockpit assembly and set aside to dry.
Now comes the fun part, putting the two body halves together.
In the assembly of the rocket halves I had the most trouble. In a recent review in Scale Aviation Modeler International (EMW A9 – SAMI – Dec '97, EMW A4b – SAMI – Jan '98) the reviewer said the assembly was "swift and trouble free". Well, either I got 2 bad kits or the reviewer is being biased but the rocket halves in my kits didn't match very well. The cross sectional thicknesses where they are joined are of varying widths. This ended up causing low and high points along the seam that will require filling and sanding. On a round structure this ends up causing flat spots along the seam unless you sand all the way around the model to try and maintain the roundness. There are no locator pins on Special Hobby kits so I ended up putting my own on.
A note on the body halves: one side comes with opposing fins fully molded on both sides so that the other body half would just have a seam along the bottom portion of the fins.
If I matched up the seams on the top portion of the body the bottom seam was sticking way out. It got better as it got closer to the fins. I ended up compromising and had a little sticking out on both sides. The worst part was just in the middle of the body. Then I sanded and I filled and sanded some more until I got what looked like a reasonably good surface. There is an indentation about a millimeter wide that runs around the body just in front of the tail fins. With all the sanding it started to disappear so I had to do a little carving with the X-acto to bring the depth back out again.
Next I installed the tail fins on the A4b. The thickness of the fins and their mating surfaces don't match so I did a lot more filling and sanding. Next came the wings for the A4b. They went on great and not much of a seam. I did a lot of prefitting and sanded down high spots so that I'd get a good mating surface. Just a little bit of filling and sanding needed. Next I did the wings of the A9. Same here as the A4b as far as fit. The only slight trouble was the tail fin area again and matching thickness.
I decided to install the canopy prior to painting. Special Hobby vac canopies are not the clearest. Before cutting it out I did a little polishing and coated it with Future floor polish. That improved it tremendously. After cutting it out I noticed the front of the canopy was more tapered then the rounded opening of the cockpit. I ended up building up the exposed portions of the cockpit with super glue and accelerator. I then attached the canopy and masked it off. Now I was ready to start painting.
The A4b calls out for a splinter pattern of RLM 76 light blue, RLM 81 brown-violet and RLM 83 light green. I followed this pattern except I substituted RLM 84 (sky-blue/green) for RLM 76 and used RLM 81A instead of RLM 81. I used Aeromaster enamels and I painted overall RLM 84 first and let this dry for a few days. I then spent about 4 hours taping off the sections of RLM 84. I then painted RLM 83. After that had dried for a few days I spent another 4 hours doing the last taping and painted RLM 81A. As soon as I was done with this last color I removed all the tape slowly. I then did whatever touchups were necessary.
For the A9 the colors are RLM 76 with a wavy pattern of RLM 75. The rudders are RLM 23 red. I followed the pattern per the instructions. I used Testors Modelmaster 2 enamels. I painted it overall RLM 76 and then applied the RLM 75 freehand with my airbrush. After the paint had dried for a few days I taped off the areas for the rudders and painted them red.
I gave both kits a couple gloss coats of Future. I let this dry for a few days before I started with the decals.
The decal sheet provides 2 red lines that are to be used on the model. One is to go around the body by the tail fins. I couldn't tell if it was suppose to go into the indentation I spoke of earlier or behind it. The other red line is used around the cockpit. It outlines the panel that would be jettisoned when the pilot ejects. I just wound up painting all of these areas instead of using the decals. I decided I would paint the indentation.
The decals for the kit went on with hardly a problem. They were thin and the gloss under coat helped. After they dried a few days I went over them with another coat of Future to seal them. Final paint was an over spray of Testors Dullcoat.
Remove the tape from the canopy from both kits, put on the jet vanes and dipoles for the A4b and I'm done.
I won't go into the construction of the launch pad for the A4b but suffice it to say I'm not sure how the A4b is going to stay on since there's nothing to anchor it to and I don't want to glue it on. The A9 would not have a launch stand since it was the second stage to the Amerika rocket.
I used a lot of references from Miranda's "Secret Wonder Weapons of the Third Reich", Monogram's V Missiles book, photos provided by Richard Pedro of Silicon Valley Scale Modelers and Gary Webster's German VTO Projects of WW II web site http://home.earthlink.net/~gawebster/home1.html.
EMW A9 Piloted Version - A & V Resins - $ ???
With a dozen pieces including the canopy this should be a quick build . Most of the work will be in cleaning up the main body piece and rocket nozzle piece . The cockpit area can be detailed if desired but the area involved is small. The decals are MPD so find alternatives . Try Silverbird or Hannants. Debatable whether the Special Hobby version is any better given it is them . I've had this kit for a while so I doubt whether you can get it now.EMW Manned A-9 - Part Time Models - Wulf Corbett
I like this. This is my favourite of the four, in fact it ranks high on my Luft'46 list. Interestingly, my fuselage is two-tone, the nose and fuselage back to the fin bases is a sort of greyish-yellow, darker than all the other bits, and all the other kits, which are all the usual resin cream-yellow. The greyish bit has a perfect surface, with no bubbles, while the cream bits (on all kits) have the odd pinhole.
It could be the mould, or some other factor, but I recommend the grey stuff in future Scott... More bits this time, the usual big bit for the basic fuselage, plus 2 wings, 3 tail fins, a half-ramjet (the other half is part of the fuselage, giving accurate internal shape to the ramjet), and 4 little rocket exhaust vanes. No transparency - according to the drawings, the pilot had about as much of an external view as the Gemini astronauts... The wing-to fuselage joint could take some work to fair in, but locating tabs are moulded on (although they may disappear while I clean up the parts...). I need at least another one of these, one at launch, vertically, one on landing, wheels down. I wish I was better at scratch-building undercarriages...
See the Me P1106 for Scott's Web page address