 |
| Manufacturers |
| Fw
List |
| FW Ta-154 |
| FW Ta-183 |
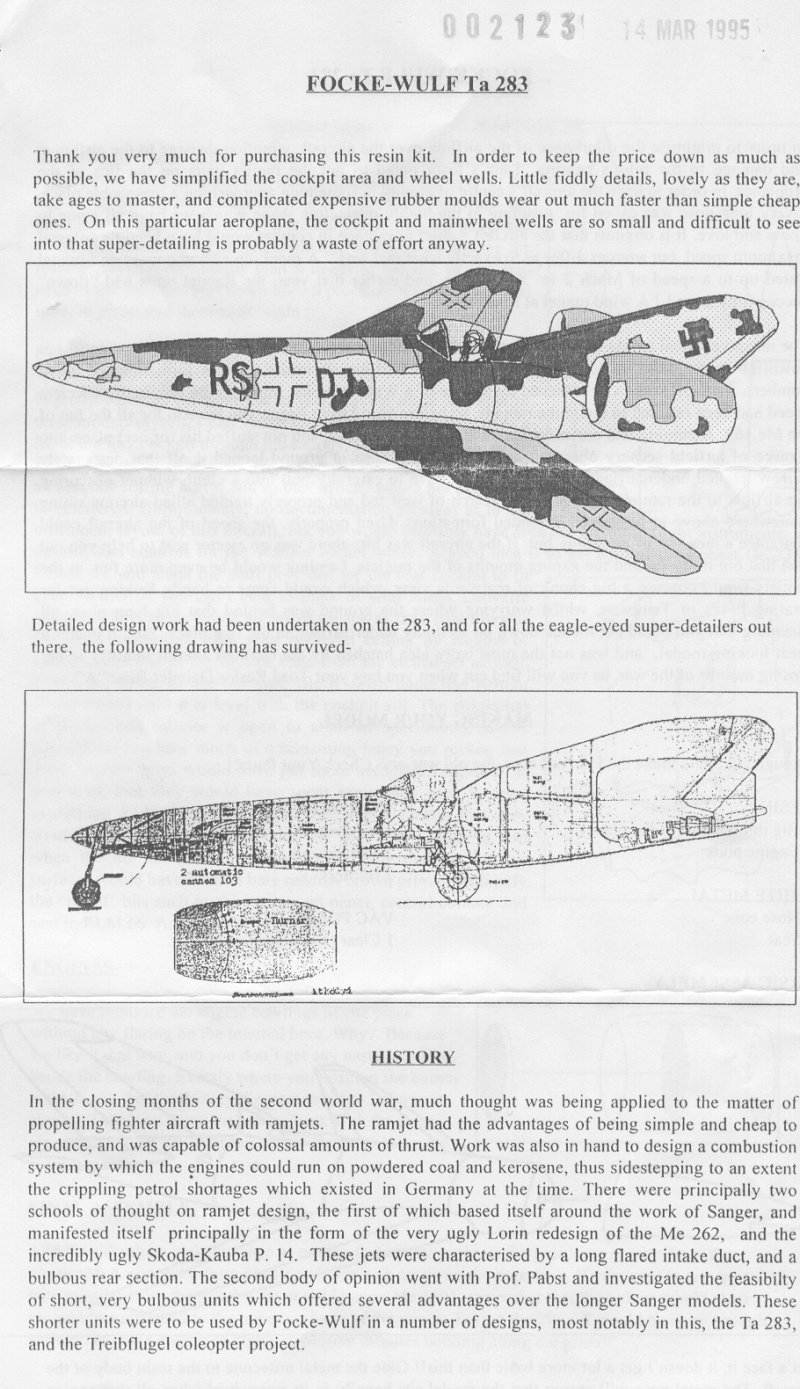
| FW-283 |
| FW Treibflugel |
| FW Victoria Tail |
| Home |
1/48 Arba
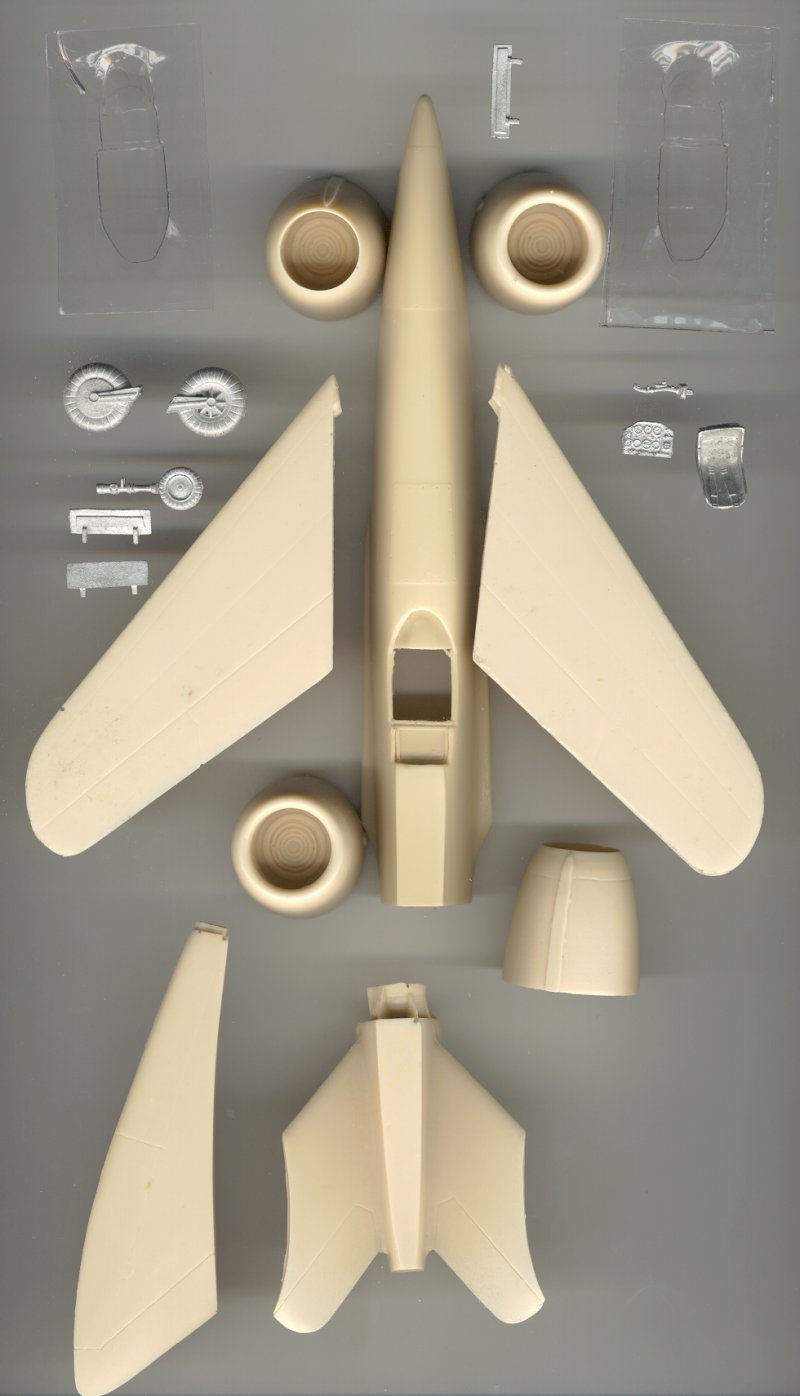
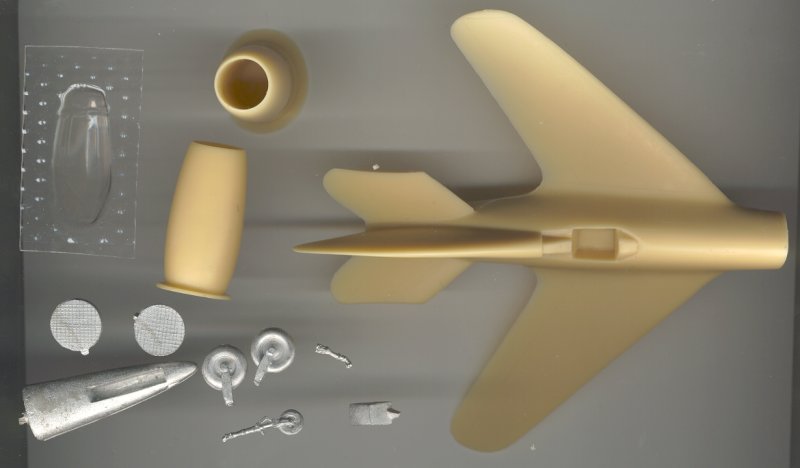
This kit arrives in a box barely big enough for a 1/72 scale version . They must have shoe horned the parts into the box . Certainly saves on postage but once opened you'll never get it back in completely. The parts are reasonably well cast though a quick effort with some 1200 grade sandpaper would give a smoother surface. Whilst it has a few more parts than the Toad Resins it's not many more. The main body has a mould line which needs filling & sanding and all parts have moulding lugs that must be removed. The U/c , the doors thereof and the cockpit seat and instrument panel are all white metal reasonably well cast. There are a few air bubbles but nothing major. Generously there are 2 vacformed canopies but both are a little frosted . I would be tempted to use 1200 grade sandpaper on these followed by Tamiya Polishing compound. The big ramjet engines are each cast in two pieces with nice detailing. Given the large size of the kit the wings could possibly use some metal spars for joining ( Yeah I know I hate this but it looks necessary given everything is solid resin ) .
My overall impression is a very doable kit for the average modeller and it will certainly stand out. I'm unsure whether it is still in production though. |
 |
 |
 |
1/48 Arba - Resin
Doug Devers
This 1/48 offering from Arba is up to their usual nice standards. It has very clean mouldings, fine engraved panel lines, and overall decent fit. Starting with the cockpit, there is quite a bit of resin to be removed to get the white metal instrument panel to fit. The cockpit has a white metal seat and stick, it's built on a plug that goes in from the bottom, and looks nice when finished. I painted it in RLM 66 with the seat in 02, and tan seatbelts. As is usual with resin kits, there are no locating tabs for the wings or tail, but with a little sanding, they fit pretty well. The ramjet pods were attached to the tailplanes using short lengths of brass rod to strengthen the joint as they are pretty heavy. This one is definitely a tailsitter, so you may want to consider permanently mounting it to a display base, as there's really no place to put enough weight in the nose to counterbalance the engines. Two vacuform canopies are provided, and the fit was surprisingly good there. Landing gear is also white metal, and my example had an extra set of doors.
Wheelwells and lg struts were painted RLM 02 with a dark grey wash. The camo scheme is a splinter pattern of 82/83 over 76 done with Testors Acryl, and the last of an old bottle of Pactra RLM 83. Decals were scrounged from some spares.
This kit was a fairly straightforward build that I enjoyed quite a bit, and I can recommend it to anyone with experience with a resin kit or two.
P.S. The only camera I have is a Polaroid, which is pretty much worthless for model photography, so I'll borrow mom's camera and get a picture or two soon.
1/72 Toad Resins Kit
John Clarke N.Z.
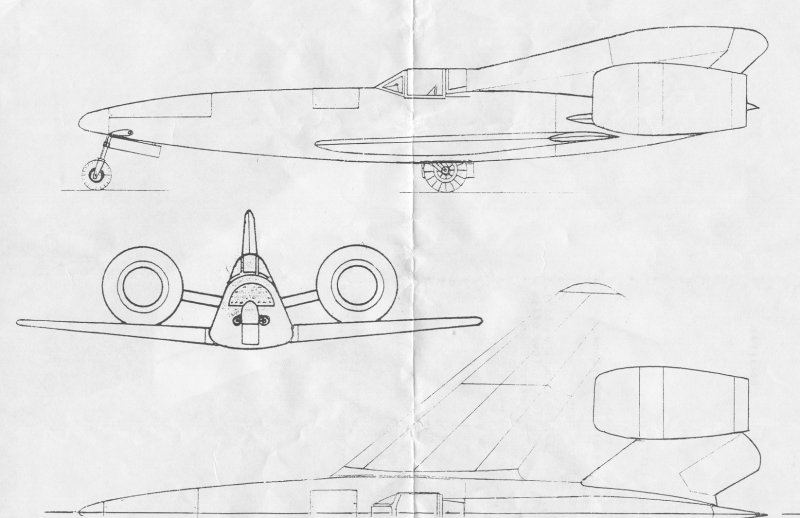
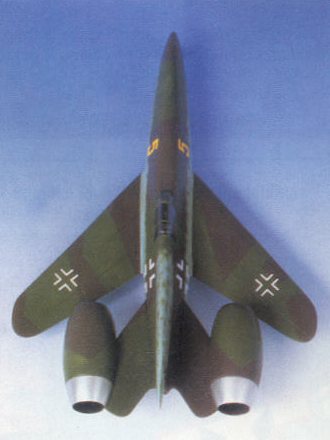
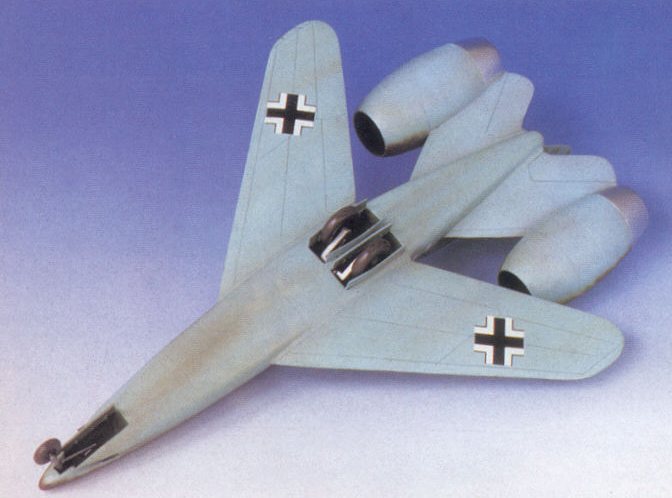
The Ta 283 was a project for a fighter to be powered by 2 ram jets running on powdered coal & kerosene like the Li P13a.
The kit comprises 11 white metal & resin parts plus a vacuum formed canopy which all come in a sturdy box. There is little surface detail on the resin parts, but they are free form surface holes. the white metal parts are also of a similar quality.
As is normal with Toad resin kits you have to make your own undercarriage door, no templates provided this time.
The instructions for what is a simple model, are excellent and show the normal brand of Toad humour.
With the model having such a low undercarriage there is not much room for anything to hang from the underside of the aircraft.
All in all this should build up in to a nice model of one of the weirder German project aircraft, and is a nice simple kit with which to start working in resin / White metal.
(Editors note : Toad have recently cut back severely on
production -
only the Ju 388J-3 is
currently available - If you have one of their kits then you are lucky
as I doubt whether older kits
like this will be reissued which is a pity . )
The Ta 283 was a project for a ram jet powered fighter, with a Walter rocket engine providing takeoff power. If this project aircraft had materialised it would have been one of the fastest aircraft around.
The Toad kit comes in a robust box containing parts & 6 page instruction / information sheet. This is a multimedia kit (resin & white metal) with no decals or undercarriage doors.
The kit contains only 12 parts. most of the fuselage comes as one piece! The surface detail is a bit sparse but what's there is well done with the plus of no seam lines to sand off.
The kit goes together well with attention needing to be taken in positioning the engine pods. On my example the white metal nose was not symmetrical, filler & sanding was required to correct this problem.
Because of the white metal nose on this kit there is no need to add any extra weight to the nose down, the undercarriage is moulded in one piece, the main wheels are not really long enough & could do with being a few mm longer. As is normal you have to make the undercarriage doors from plastic card, there are no template or dimensions in the instructions.
The cockpit is spartan, the vacuum formed canopy fitted well with no problems.
All in all a very pleasant kit to build with no hidden vices.
I finished my model in a late war mottle of RLM 74 / 75 with RLM 76 undersurfaces.
Toad kits may be unavailable at the moment but could be reissued in the near future!
 |
 |
 |
 |
 |
 |
| Here is John's finished kit. | 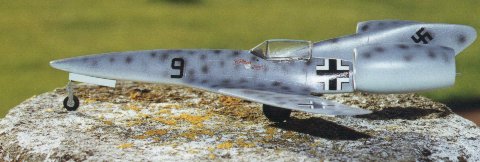 |
And Mark Hernandez's version | 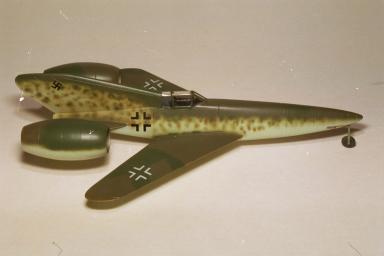 |
1/72 Unicraft
There is also a Unicraft kit but the Huma one reviewed below is preferable.
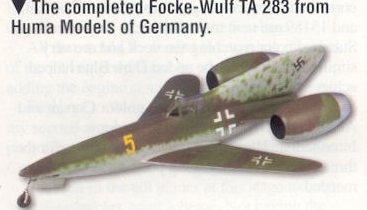
Huma - 1/72
Fraser Gray; Military In Scale February 1997.
The Aircraft:
The Luftwaffe's wonder weapons have arrived, fifty years late
and in
plastic kit form to continue
the wartime conflict on the model shop shelves. The ingenious and
bizarre designs reflect the
enormous technical progress made by Germany's wartime aircraft
industry, and make a welcome
change to the endless variants of Spitfires and Messerschmitt Bf-109
kits. Increasingly
mainstream manufacturers such as Revell and Dragon are producing kits
from this significant
period of aviation history. Until recently this has been the niche
market of small resin kit
producers whose limited production kits sold for stratospheric prices.
Resin kit firms are now
finding their style being cramped by the major manufacturers who are
providing hordes of the
fascinating late war paper projects at affordable prices.
German company Huma, who have for many years produced kits of
the
Luftwaffe's Rare Birds,
have now boxed a model of the Ta-283, which was designed by Kurt Tank
as the fighter's
designation indicates. Tank was chief designer and technical director
of the Focke-Wulf
Flugzeugbau and creator of the Fw190, considered to be the top German
fighter of the war.
The Ta-283 owes its advanced appearance to the prolific designer and
Tank's plans were close to
completion before the collapse of the Reich prevented the fighter from
taking to the air. The
Ta-283 was to be powered by two Pabst aero thermodynamic ducts, or
ramjets. The engines
operated on the principal of a simple jet engine, and being devoid of a
turbine to compress air,
relied on a small Walter rocket motor mounted in the rear fuselage to
accelerate the aircraft at
takeoff.
The rapid forward motion provided by the rocket engine rammed air into the propulsion engines mounted on the tailplane. At the correct air pressure ignition would then take place in a series of rapid pulses as covered shutters would alternatively open and close at the front end of each engine, producing the characteristic 'buzzing' sound associated with the V1 flying bomb's pulse-jet. Each of the ramjets produced an incredible 10,850 hp, swiftly accelerating the fighter to 680 mph at sea level, decreasing to 592 mph at an altitude of 36,000 feet. With a flight time of 43 minutes the Ta-283 was clearly designed to launch a pilot and two 30mm MK 103 cannons into the B-17 bomber streams as quickly as possible, limiting the fighter's rôle to target defence.
The Kit:
The assembly of Huma's 1/72nd scale Ta-283 is straightforward and generally the detailing and fit of the kit's 37 components is good, with the exception of the canopy, but more on this later. To produce a presentable model it is vital to add ballast to the model's nose or the finished model will 'tail-sit'. This is a tricky procedure, as the most appropriate position for the counterbalance is occupied by the delicate nose landing gear. This forces the modeller to cement the weight behind the wheel well bulkhead (part 19).
The ballast is now closer to the model's centre of balance, requiring additional weight, but with the possibility of the extra ballast distorting or collapsing the delicate undercarriage. To discover the optimum weight for the counterbalance, I dry assembled all the components and gradually glued split fishing shot inside the fuselage one piece at a time until I had achieved the correct balance. A very tedious process but one I considered worthwhile to avoid the problems mentioned.
Improvements can then be carried out on the air intakes of the ramjets by removing the prominent location pegs which spoil the engine's appearance when viewed from head-on. Care should also be taken when aligning the small holes of the air intake shutters (parts 27 and 30) so that they present a symmetrical appearance when the port and starboard ramjets are attached to the tailplane. Again, make a trial assembly of these components to ensure a presentable model.
Problems:
With the Ta-283 major subassemblies complete it brings me to
the
worst part of the kit, the
canopy. I admit I have only constructed a few aircraft kits, my main
interest is AFVs, but I have
universally found the canopies never fit! The kit's canopy is moulded
in a thick clear plastic with
distorted canopy frames and lets down an otherwise good model. (Almost
my only quibble here:
when I built my Ta-283, the canopy was quite adequate and fitted well
without any
song-and-dance. Maybe I got a good one, or our reviewer here got a
lemon. It happens. PM)
I was therefore forced to remould the component. The first stage of the corrective process is to sand and file the canopy to achieve a good fit to the fuselage. Do not worry about removing the support frames as they are grossly over-scale. Of course by this stage the clarity of the canopy has been ruined beyond any restorative polishing. Stage two, requires the modeller to pack the inside of the canopy with Milliput to act as a 'shoe'. When the binary putty has cured drill a hole and attach a handle from wood dowel or an old paintbrush ferrule. The contraption can then be firmly fixed in a workbench vice.
The final stage in restoration requires some clear plastic and a candle. Cut the clear plastic into sections approximately 35cm by 20 cm and gradually heat a section of clear plastic. Be careful not to burn yourself, and ensure the heat is evenly dissipated by moving the plastic in a circular motion over the flame. When the plastic begins to soften, pull it sharply down over the kit's canopy held in the vice. When the plastic has cooled the new canopy can be trimmed from the waste plastic and fitted to the model. The canopy frames can be restored by careful masking at the painting stage.
Paint and Markings:
The presentable instruction sheet supplies the modeller with a
full
colour diagram for painting the
finished model, and makes a pleasant change from the drab schematic
supplied with most kits. By
and large I followed Huma's suggestions, although I think the exhaust
venturi of the ramjet
would be natural metal. The tremendous temperatures of the exhaust
gases would scorch the
paintwork and make the application of camouflage pointless. (I
agree, but instead of just painting
the exhausts silver (unless the photos which accompanied this review do
the finished model no
justice) I tried to replicate this burning-off of a presumably
sprayed-on camouflage coat and the
'bluing' of the exposed metal with various Metalcote paints. Fiddly,
but satisfying. I suppose it
made up for not re-moulding the canopy... PM) After judicious
weathering and a coat of satin
varnish I decorated the model with decals intended for a Messerschmitt
Me-262, as the kit's
decals are a disappointment.
If you are after a 'comment-catcher', then Huma's Ta-283 will
make a
fine addition to your
collection. Generally speaking, I enjoyed building the model and it has
increased my interest in
this brief moment of aviation. It is worth remembering that most of
these paper projects had
reached an advanced stage of design, and in some cases prototypes,
before the war ended. What
sears the imagination is what the next generation after these designs
would have been like!
(And can you imagine what a combined point-defence sortie by these babies and a Jagdgeschwader of Triebflügels would have looked like? Wow...! PM)
These scans from the magazine were kindly provided by Charlie Hugo.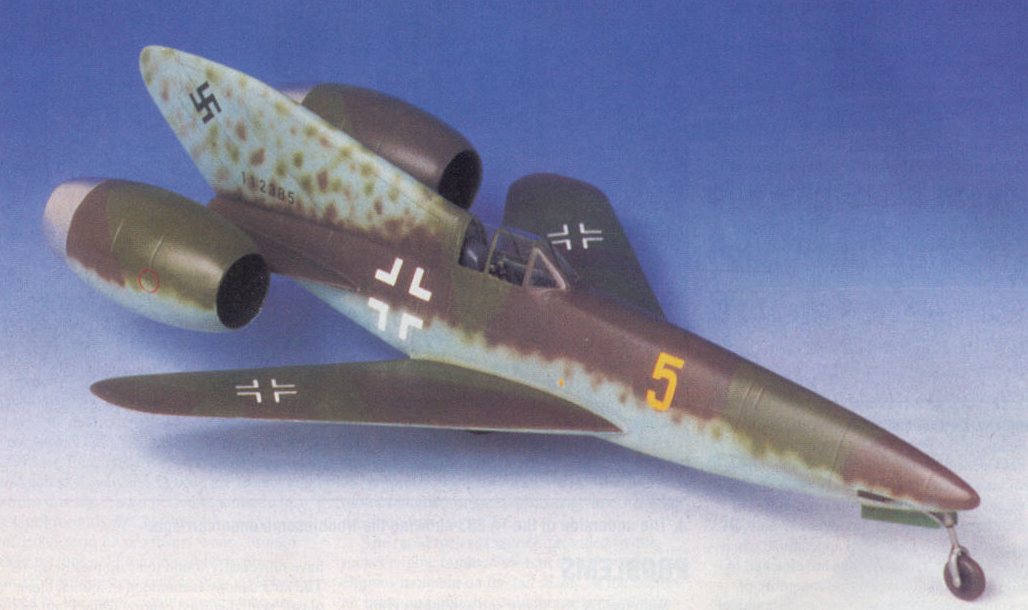 |
 |
 |
 |