 |
| Manufacturers |
| Ju List |
| Ju 388 |
| Ju 488 |
| Ju EF009 |
| Ju EF126 |
| Ju EF127 |
| Ju SFP |
| Home |
Unicraft - Resin - 1/72
William Moore
Back in '94 I first bought 2 Unicraft kits from Hannants. They accidentally sent me 3. I looked at how bad they were ( Messerchmitt Libelle was one ) and figured I was going to almost double the weight of the kit in filler there were that many holes and half cast bits. I sent all 3 back vowing to never touch Unicraft again. Earlier this year I finally gave in to the comments of a few on GPL and ordered a few kits but I still wasn't that happy with them so I wrote to Igor with my opinion. He replied that the kits I had ordered were all old moulds and that maybe I should try a few of the newer ones.
I did and when I returned from holidays recently there was a brown paper covered parcel ( no not that sort of thing !!!! ) which I took inside and opened up. I was pleasantly surprised to find that although flash is still a problem the basic parts looked well cast. I was going to start with the Okha 53 as a comparison to AV's Okha 43 but the siren call of the Junkers SFP was impossible to resist. I kept going past it and pulling the parts out and thinking about building it.
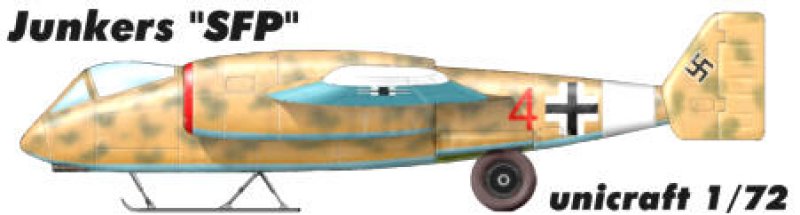
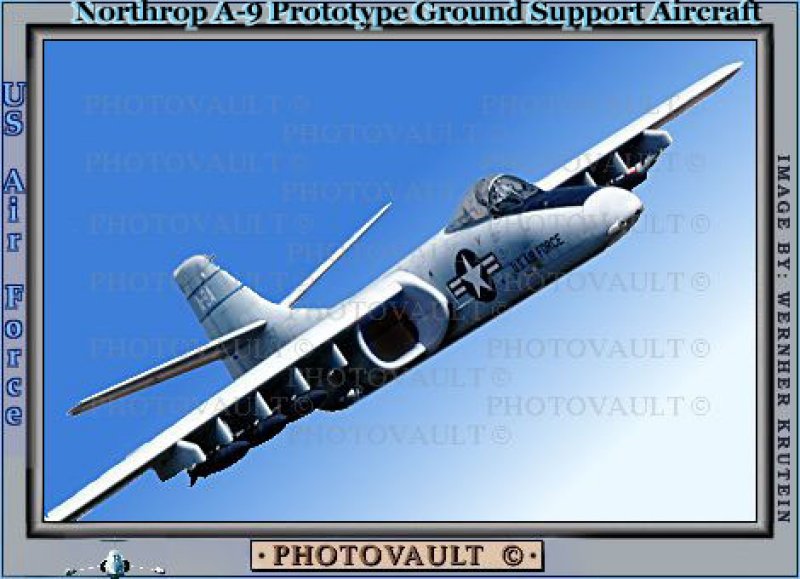
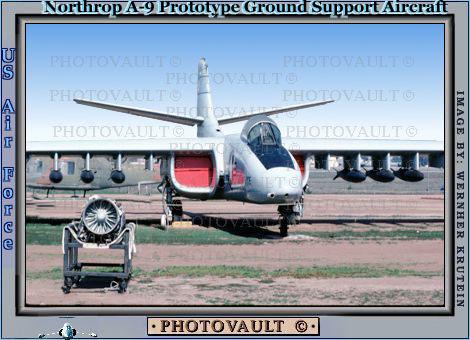
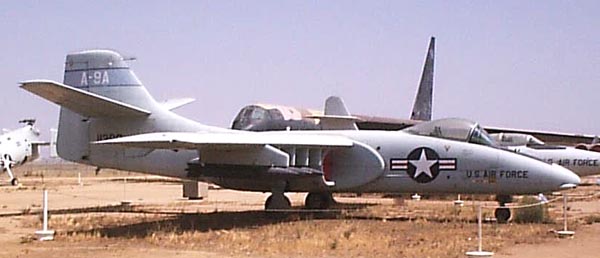
The box top art is quite nice and very enticing. Igor calls the SFP the Luftwaffe's A-10 Warthog but IIRC it is actually closer in shape to it's unsuccessful competitor the Northrop A-9. I believe Maintrack bought out a vacform of the A-9 a few years back. The instructions are fairly good including a basic info sheet, a typical pictograph construction diagram and a sheet giving 2 suggested colour schemes of which one is for North Africa, but no decals. What surprised me was that the design dates from 1941 and was not a 44/45 bierkeller drawing to avoid the Russian Front. As Igor states although the intended powerplant was the Jumo 004B's the design seems to show much shorter fatter engines more like the Warthog. Anyway if Hitler had've not slowed development on a/c around this time and if more strategic metals had been available maybe it would have been a Jumo 007 or similar.
 |
 |
 |
The usual warnings on resin dust apply doubly here - I ended up doing cleanup in a little ashpan I keep near my desk as the dust then had less far to travel and the use of wet sandpaper is advisable.
For most of the parts it was a case of remove them from the lugs first - here a razor saw was especially useful. Next was using sandpaper to cleanup mould lines followed by work with my X-acto knife to remove the bubbles. Surprisingly on most parts there were few airbubbles to fill and a couple of dents and that was all. This all took time though and over 4 hours was devoted just to cleanup up the parts so far and more required.
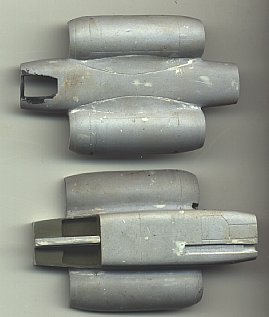
The tailplane comes as one unit with two rudders to add. Each wing is in one piece and the body is logically split along the middle horizontally. I particularly liked the fact that the vacform canopy came with a moulding plug which made trimming it to size so much easier. The nose section is solid and includes the gun area but you will need to add your own barrel from brass or similar. The engine area has both inlet and exhaust pieces and whilst the exhaust onions were good the inlets were not. Both pieces suffered from airbubbles and - as these were in the fan blades - filler and careful shaping were required.
The main body section looks like an Aerobar on the inside with all the air bubbles but I'd much rather see them there than outside. The top section around the jet intakes suffers from indistinct scribing in parts with sometimes multiple lines where one is needed. On one side a little trimming is needed where the body and engine meet at the rear - probably a moulding difficulty given the blending of two curving surfaces, a bit of cleanup and filler is required here.
Other problems encountered were the the skid - according to the diagram supplied this looked a bit large so I started to thin it. Naturally enough after a few minutes this snapped, being quite brittle. I then grabbed a parts sprue from the Dragon He 219 kit - this had the kit name on it and after scraping off the name and some cutting and bending looks the part. I next had a look at the retraction jacks for this and for some reason I only have two which I'll have to amend later. The wheels supplied are pretty ordinary and I decided to replace these with some He219 wheels which I had spare. Anyway as it turned out the kit wheels are way overscale in width according to the plans - more suited to a He177.
This bought me to my next problem which is the wheel wells. These are located at the rear of the engines and are too shallow - even for He219 wheels - so it's off to my mate who has a Dremel for some serious gouging prior to filler and plasticard to get the right size. Maybe I'll add a few stringers etc while I'm at it - roll on AMS - then again maybe not ! In the end all the work involved made me go out and buy my own Dremel - actually Minicraft.
The u/c legs with the kit are resin and I managed to break one in the process of removing the flash. This is one area where I'd really like to plead with Igor - SWITCH TO WHITE METAL u/c - it's so much better, stronger and unbreakable. AV have done this and I love it - I even wish Planet would !!!!
Next up was gluing in the cockpit area. First I got out the kit seat which is quite nice but sloped too far back. I broke this at the base and reglued in a near vertical position like the Hs 129. I then added the instrument panel at the front and test fitted the floor bulkhead which you make yourself. After doing this I realised the seat, intruments and joystick ( homemade ) were not all going to fit so I carved the body behind the pilots seat area so that all would fit - this took it back to near the rear edge of the canopy. I intend adding some side panels and basic instrument panels to round out this area.
I then spent a lot of time trying to get the 4 engine fan parts to fit inside the body - this lead to much tedious dryfitting but eventually I was happy and slammed the two body halves together after adding some lead behind the cockpit area. Beware here as the rear onions project too far out and will foul the big flaps behiind the engines - you will need to reduce their size - which I had to do too late .
At this stage I thought things were going well and started carving the inlets/exhausts to a more appropriate size according to the diagram in the instructions . This proved nearly impossible to get circular so I started cheating . For the rear exhausts I bought some metal tubing ( approx 11mm diam ) at my local hobby shop and carved the area out until there was room enough for the tubing and then cut and inserted this . This now looked quite circular . I had reamed out the tubing to get a larger outlet for the exhaust and filled up any bits on the outside where I'd caused a couple of dings in my haste.
I did this also for the front . In hindsight what I should have done was the following - remove the backing area where the fans are fixed and mark this . Clean up the fans and cut out the tubing to fit into the inlets then when cut to the correct length add the fans at the rear of this tube and lay all into the bottom half of the fuselage . Make sure the fans are positioned at the centre of the tubing . Do necessary carving to get it looking ok then glue the body halves together - otherwise it's hard to get the fans in the centre and they then look lopsided - see my photo below INSERT INLET PHOTO HERE !!!!!!!!!!!!!!
The next bit was the nose . I wasn't happy with the bump here representing a gunsight and cut it off and replaced it later with a scratchbuilt item based on the Hs 129's one . An article in Tamiya magazine on the new 1/48 Hs 129 and the MBI book ( NKR Models ) helped here . See rough diagram below for dimensions .
The nose is too big for attaching to the body . I solved this problem with my favourite filler - Milliput. I know some people use superglue as a filler but mostly with resin kits I'm looking to fill too big an area for superglue just to help ( tho I did use it elsewhere on this kit as a quick filler ) . What I did here was to mix up some Milliput and use it as a filler between the nose and the body - I then squashed the nose on and genlty maneouvred the nose and Milliput till I got the best fit possible . Of course that was it for that nights modelling while the Milliput set . I came back next day and sanded and filled again and after one more sand it was perfectly blended .
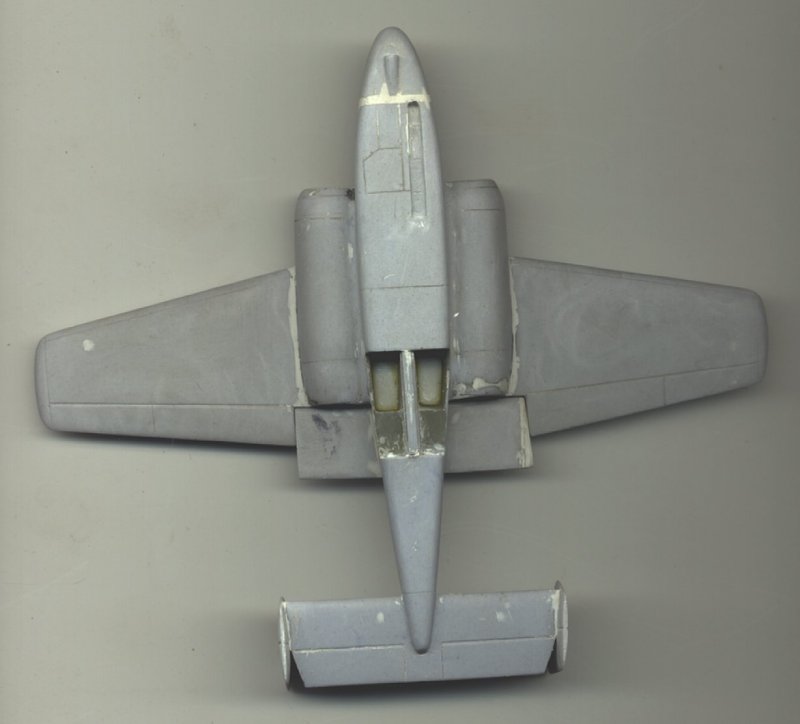
Having got the body together I turned to the wings and tailplanes . The tail section after a little sanding went on fine and I used superglue here to fill the gaps - nothing much . The tailplanes went on fine also . The wings I lined up and glued on with lots of super glue - not unusual in resin kits for me . Having done this I thought I'd got it all square . I then took it inside to my Quality Inspector ( she who must be obeyed ) who informed me that it was all ok except when viewed from above . One wing canted forward and one backward slightly but the combined effect not good . I returned to my shed to rip my hair out and the wings off - grrr !!
In the end I got this sorted out but it still doesn't look quite all square but then again I think this may never happen anyway given the hand carved nature of the moulding. After cleaning up the body I was nearly ready to primer so I went to add the flaps behind the engines . Due to the heat they would likely receive they are thicker than the outer flaps but in my one they are not wide enough. I fixed this with Milliput yet again . Below is a scan of the kit just before primer was applied .
The middle scan is some of the leftover resin.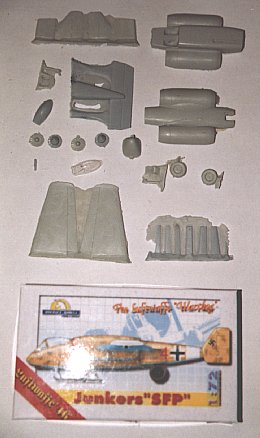 |
 |
 |
 |
 |
 |
Overall I am happy with this kit - it is more cleanup than I'm
used
to but
none of the faults except the brittle u/c is unusual to other resin
kits at
various times. It is certainly a kit you craft and not a throw together
job but I'm really happy with the finished job which is certainly one
of a kind . And probably most tellingly is that I have ordered more
Unicraft kits . This is a kit that could only be recommended to
experienced modellers and by that I mean people whose modelling career
has not consisted entirely of doing the latest Tamigawa shake the box
kit - however long they've been modelling . These sort of kits demand
you get dirty and think - you will actually do lots of sanding filling
and fabricating - if that's not your scene then avoid Unicraft like the
plague . Personally the occasional one will do me but I must go find
something easy now -hmm now where did I put my plastic kits!