 |
| Manufacturers |
| HS List |
| HS 132 |
| HS P 75 |
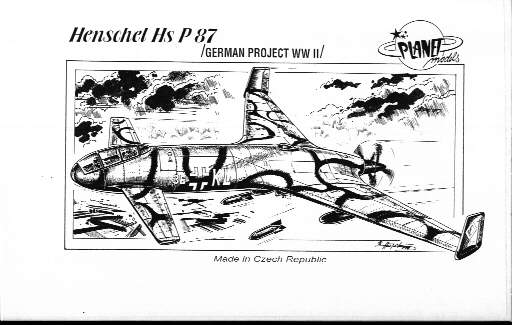
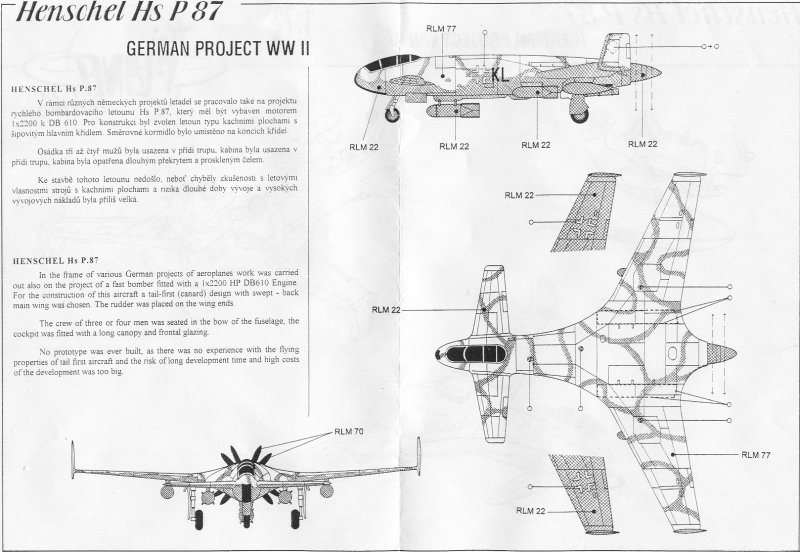
| HS P 87 |
| HS P 122 |
| HS P 135 |
| HS PJ 600/67 |
| Home |
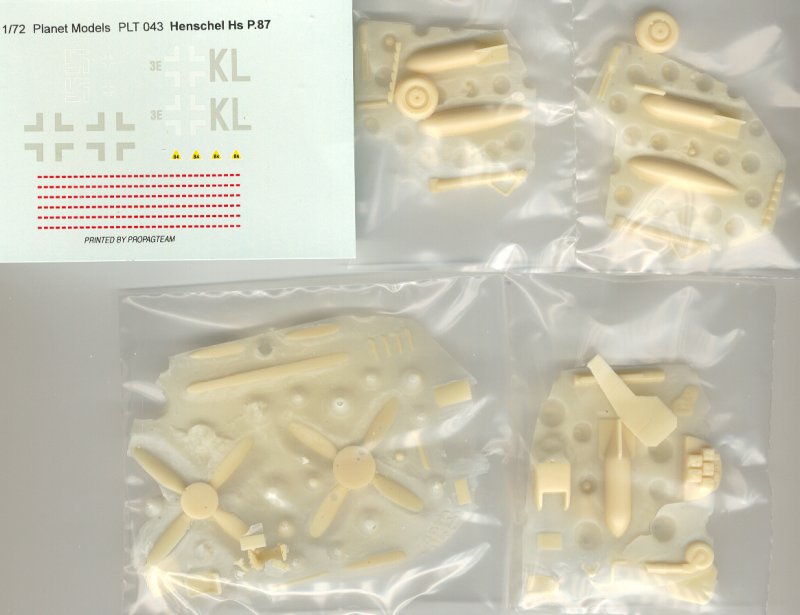
Planet Models 1/72
Graham Causer
The Fiction..............
In late 1945 the german Navy was still
actively
pursuing more independence in aviation and Henschel were further
developing their 'pusher' aircraft design. In these circumstances both
entities were given permission to run 'hand in hand' to perfect a fast
anti-shipping strike aircraft that could attack the allied boats that
were moving freely across the English Channel. During the semi-cover of
dusk in the autumn and winter evenings of 1945/46 the newly formed unit
of Marinefliegergeschwader 1, (MFG.1), flew their Hs P.87's against the
allied shipping with deadly effect. The specially camouflaged aircraft
hauled a single 'Fritz X' for use against warships and tankers. From
time to time additional 'conventional' bombs were also taken along for
use on targets of 'oppourtunity' that were so often found on the
homeward flight. One, two, or three external fuel tanks provided extra
endurance over the target area.
The Facts..............
As soon as I saw the box art for the P.87 in a UK magazine advert I knew I just had to build this aircraft - but not at that price! I placed an order with Earl Martel, NKR Models, on a Sunday and received my kit the following weekend - from Australia! I saved big money too.....!
The yellow ochre coloured parts were detached from each other and 'cleaned up'. Very little work was required and everything fitted together well. Just like building a vac-form, I used wet'n dry on a flat surface, and used 'dry', to rub down the wing halves to get a good shape and fit. The same with the fuselage and we were ready to go! I inserted a length of brass rod through the fuselage halves and into each wing just to add a little support at the wing - fuselage joints. The last resin kit that I built was assembled using two-part '5 minute epoxy' glue so, this time, I used 'cyanoacrylate' thin superglue. It proved to be highly successful. When there was a slight gap at a joint I just rubbed a little piece of spare kit resin onto some fine sandpaper then dusted the powder into the gap and added a spot of superglue and I had 'instant filler' - and it worked a treat!
I couldn't help myself, such a nice model begged for something extra, I cut out the canard's elevators and the main wing's inner 'flaps'. I used plasticard replacement parts that were produced in minutes. The cockpit interior was assembled as per the instructions diagram and painted Rlm 66 'schwarzgrau', or black-grey, and was fitted prior to joining the fuselage halves. Very little adjustment was required here - the fit was good. There was no apparent instrument panel for the pilot so I modified and fitted one from a Me 262 etched brass detail set. It was attached to the left side of the cockpit sidewall. The same source provided seat straps. I just fancied green for the seats, tan for the straps and picked out some dial and clock detail in silver. One or two dabs of red and yellow here and there and a 'drybrush' of matt black, then matt white, finished the cockpit.
The main wheels were fixed to their legs via a cut off sewing pin. I used a mini drill to bore the hole through the wheels and legs. Once again, the fit of all parts was good. The same drill opened the inlet to the upper fuselage air intake. The dreaded vac-form canopy was next only because I wanted to test its fit! With careful cutting and constant checks, a little emery nail file adjustment and a touch of fuselage sanding it fitted. Later, it was to be fixed in place with 'Krystal Kleer'. The nose front glazing panel had the same treatment and also fitted quite well!
I didn't like the supplied propellors one bit. I had some spares and recovered them from the depths of the toolbox. I'm not sure of the original source but I do know they were 'Frog'. ( Maybe D.H. Hornet or Westland Wyvern ). I'm sure that 'Aeroclub' could offer a good alternative from the range of white metal props that they produce. My props may be a touch oversize but I felt they looked more to scale than the originals and give an impression that they 'mean business'. I used a razor saw to cut off the originals and grafted my 'props' onto the kit's drive shaft and spinner. I was delighted with the result. Pitot tube and aerials are from heat stretched plastic sprue.
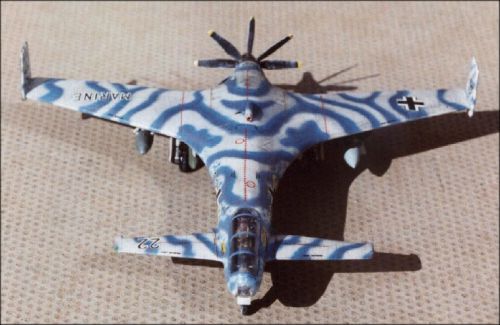
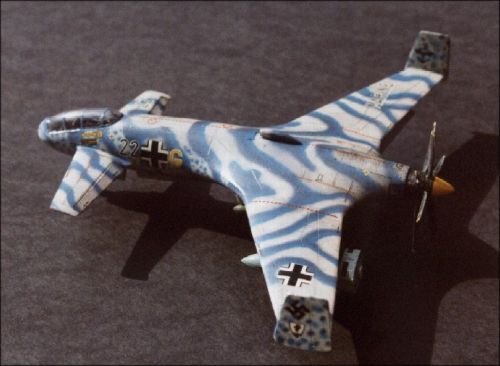
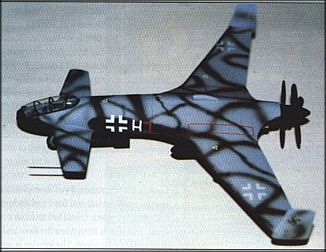
I had already decided that I was going to 'do my own thing' with the camo and produce a navy anti-shipping aircraft. I just knew from the very beginning what I was going to do with this one....I had decals for a MFG.1 Starfighter and an Italeri Dornier Do-217 K2 supplied a 'Fritz X'. I could have used the supplied bombs and tanks but chose to use those from a Hasegawa Me.262. Further decals came from my 'spares' selection. I have seen some nice camo schemes on US Navy A-4's and elected to go for 'blues' on 'grey'.
I had wanted to use RLM colours and almost made it but had to include an 'FS' paint. I used my 'Aztec' airbrush to spray overall matt white to check for imperfections, a light rub of wet 'n dry - used wet, and then overall RLM77, Hellgrau. The patterns are RLM24 Dunkelblau and FS15183 Bright Blue. My 'Fritz X' is RLM76 Lichtblau. Bombs are FS34102 'cos I like it! The sprayed colours are Xtracolor because they mix and spray really well and the brushed colours - tyres, exhaust, interior, props etc. are Humbrol because it brushes well!
I then ground a soft lead pencil onto an emery nail file and used the powdered lead to lightly brush over the airframe to highlight some panel detail and add oil stains around the engine area. Further detail was highlighted by 'drybrushing' in matt black and matt white. The decals were added and helped to adhere by Micro Sol and Set. The whole thing is sealed with a spray of Extracolor satin varnish.
Yes, I REALLY enjoyed this kit from start to finish and thoroughly recommend it. Some experience of building resin kits and fighting vac-form canopies would be useful, but it's not a difficult kit to build. A change of propellors is a 'must' as far as I am concerned. The only cautions being the normal one's with regard to using resin - wear a mask when sanding or filing and use 'Superglue' with care. I rather fancy building another one and painting it in a more 'conventional' Luftwaffe scheme of 'greens'. I'm sure the two models would compliment each other.
.Approx. 10hrs was exhausted and most of that was painting and
decaling.
 |
 |
 |
 |
Note : there is also a Unicraft kit available for $30US. As
the
Planet kit is still readily available
I would buy that myself as Unicraft, whilst having got a lot better, is
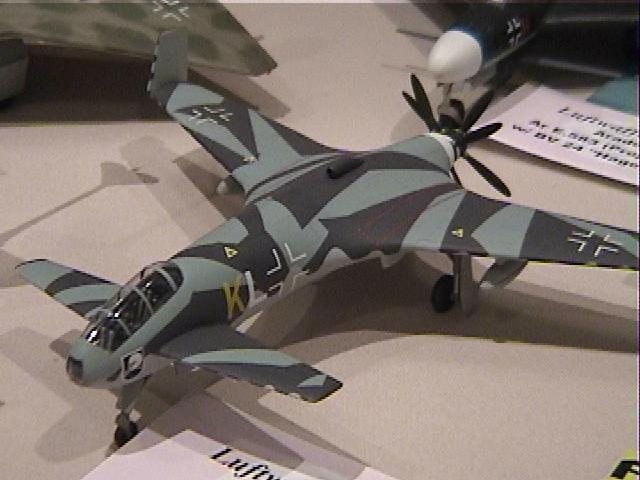
still not in the same league. Here's a rendition from the 99 US
Nats - courtesy of Mark Hernandez
Planet Models 1/72 - Resin
SAMI - Michael Cook
Yet another L46 kit - crisply cast with nice panel lines and details . Smaller parts on a thin web of resin - hard to see . Packaging is very good.
The instructions are average especially in the construction diagrams.
Large lugs to cut off big parts . Rudder pedals and some small parts difficult to clean up. Cockpit is good but very tight fit - scraping back fuselage is essential. Hard to keep all joins square to each other . Wing and canard joints need a fair bit of filler Canopy is very good but the bomb aimers window is a hard fit not being very positive .
According to Dan this is accurate .Typical Propagteam decals - stick like glue . Recommend for experienced modellers.
 |
 |
 |
 |
 |