 |
|
| Manufacturers | |
| BV
List |
|
| BV 40 | BV 141 |
| BV 155 | BV 237 |
| BV P163 | BV P170 |
| BV P178 | BV P179 |
| BV P184 | BV P188 |
| BV P192 | BV P193 |
| BV P194 | BV P196 |
| BV P197 | BV P198 |
| BV P202 | BV P203 |
| BV P204 | BV P205 |
| BV P207 | BV P208 |
| BV P209 | BV P210 |
| BV P211 | BV P212 |
| BV P213 | BV P215 |
| BV AE607 | BV MGRP |
| Home | |
RS Models - 1/72 - Resin
Graham Causer
 |
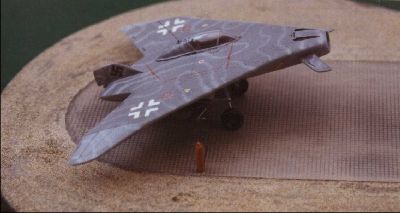 |
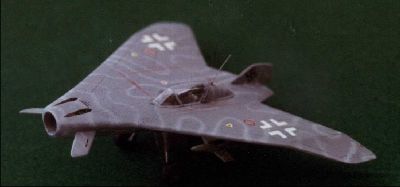
A very interesting little aircraft this one….it looks as if it would have made a nice glider – but a fighter? Then we look at the current day F-117 and its development relatives and surely there we can see the AE.607 ! Would the pilot have blasted along the runway and touched the brakes to claw it into the air like the prototype Me.262 – who knows? Could he even see where it was going during take-off and landing?
This is another resin kit and was assembled with liquid 'superglue' and patience! As usual, all the components were carefully cleaned up and checked for fit. I didn't like the missiles and they were 'binned' – the day was saved with the arrival of the Revell Me P.1101 Nightfighter which donated two injection moulded replacements. The canopy is VERY thin and I didn't like it one bit. I decided to remove the rear portion and fit it separately, filling the rear end of it with milliput and painting the whole thing in the upper camo scheme to represent a solid fairing. The canopy was a nightmare for me and I still don't like it when I look closely at my model. It is such a pity that either a thicker vac-form item, or an injection moulded one couldn't have been included. The actual aircraft body and wing is a one piece casting and has really good fine panel lines and hatch details – it is superb and is in complete contrast to the canopy! The landing gear is the biggest sub-assembly and, whilst a little awkward, can be assembled from the supplied instructions which take the form of diagrams. There are no undercarriage locating holes.
I drilled out the two upper and one lower gun troughs and added gun barrels from brass rod. I also drilled out the nose intake to give more depth and added an intake 'splitter' from the same brass rod. The twin tail wheels were lightly sanded flat at the contact point with the ground to give a nice even 'sit'. Take time with the nose canard wings and check for equal fit at both sides – I angled mine slightly downwards deliberately. My aerial was made from heat stretched plastic sprue.
Camouflage is RLM 76 undersides, RLM 75 upper and a wave pattern of RLM 63 over the '75. The lower nose area is a 'mottle' of '63 over the '76. The Xtracolor paint was applied with my Aztec airbrush. This paint can be thinned with white spirit. I chose to paint the cockpit interior in light grey and the seat matt green. My missiles and wheel hubs are matt green, landing gear grey and wheel leg oleo sections picked out in sliver. I like to very lightly 'drybrush' in matt white and then matt black to highlight airframe detail. Xtracolor is a semi-gloss to gloss finish paint to help decals adhere and when 'decaled' can be varnished in the tone of one's own choice. After applying decals, I added a light coat of thinned semi-matt varnish with the airbrush.
No decals are supplied. Mine are from various sources but in the main are leftovers from Hasegawa Me 262 kits.
The end product is a visually pleasant little aircraft that visitors think is an F-117!! I do like it and it was simple to construct. Because of the awfully thin canopy and lack of locating holes for the undercarriage I would only recommend this kit to the experienced modeller – or someone who has a lot of patience. To end on a positive note and because I do like the model – the upper surface panel detail is probably the best I have yet found on a resin kit.