|
|
| Manufacturers | |
| BV
List |
|
| BV 40 | BV 141 |
| BV 155 | BV 237 |
| BV P163 | BV P170 |
| BV P178 | BV P179 |
| BV P184 | BV P188 |
| BV P192 | BV P193 |
| BV P194 | BV P196 |
| BV P197 | BV P198 |
| BV P202 | BV P203 |
| BV P204 | BV P205 |
| BV P207 | BV P208 |
| BV P209 | BV P210 |
| BV P211 | BV P212 |
| BV P213 | BV P215 |
| BV AE607 | BV MGRP |
| Home | |
Special Hobby 1/72
Andres Valdre
|
|
|
|

First impressions of the kit. They were disappointing. When I started to build it, this feeling grew even stronger. The kit quality was quite poor ("limited edition"), flash was everywhere and all external surfaces needed to be sanded with medium sandpaper to remove the lumps there. There are no locating pins for the matching parts, as usual in the Special Hobby kits, and the fit was quite awful. For example, there was a 2-mm gap between the lower half of the port wing and the fuselage, and the cockpit floor was about 2..3 mm too wide. Prepare to use much of good filler, or stuff the gaps with scrap plastic.
There are numerous injection marks in the inside of the model, some of which are either visible or stand badly in the way. The nosewheel bay is not boxed in and the main wheel bays are too small (could be corrected, but don't show anyway unless the model is lifted up).
Fuselage. The model has tricycle undercarriage and is quite tail-heavy, but there isn't actually much space to put the nose weight. The only place I could find was just behind the intake. I used the usual mixture of lead shot in epoxy, which I later painted matt black, because it remains somewhat visible through the intake.
You'll need some filler for the seam and especially around the part which has the jet nozzles. The nose gun ports must be drilled out or deepened, otherwise not much of them can be seen (especially the middle gun port which is obscured by the fuselage seam).
Cockpit. The opening for the canopy is wide enough to allow the cockpit to be painted and detailed after joining the fuselage halves. Be sure to dry-fit the cockpit floor and other internal parts well before fixing them in place - they tend to be too large. Be careful with the turret to center and insert it at proper depth, since it could just drop inside the aft fuselage, as no stopper nor locating pin is provided for it.
The cockpit parts of the kit include three armoured seats, a stick, rudder pedals, instrument panels, a handle (most probably for the rear turret), side consoles for the aft position, and seatbelts.
The most probable colour for the cockpit must have been RLM66 black grey (I use Humbrol 32 for this), and if you mount the not particularly clear vacuform canopy in the closed position, not much detailing is needed. The delicate rudder pedals, included in the photoetch set that comes with the kit, are barely visible, and thus I saved them for some other project.
I painted the instrument panel also RLM 66 and the radar panel black, as the instruction sheet suggests. The instrument faces were painted dark grey, with some highlights - use your own experience or fantasy here. There doesn't appear to be many references about the interior of this aircraft (except some views on Dan's Luft'46 page), so feel free to use your fantasy and logic if you decide to add detail. Side and maybe even central consoles won't be bad to add, as they are completely absent in the kit. (But they won't show anyhow unless you leave the canopy open.)
I replaced the oversized "turret handle" with more delicate scratchbuilt one. The kit includes photoetch seatbelts, but I preferred to save them and made my own from masking tape. I added a scratchbuilt gunsight in front of the pilot.
Wings. The wings consist of upper and lower halves, plus vertical tails which come in one piece. The fit is not good, and the inside of the trailing edges must be sanded prior to get them sharper. As stated above, the fit between the wings and the fuselage is formidable. Make a jig and let the joint set thoroughly, before you proceed to filling the gap. (I used liquid styrene cement, and this gave adequate strength for the joint. The gap was filled first with short lengths of Evergreen strip and later superglue and filler.) The wings should have only a slight dihedral, and the vertical tails should be nearly vertical.
Undercarriage. Now I added the undercarriage, to which the wheels had been joined some days earlier. (This is not the normal order of building a model, I know, but I did add it before painting for better strength - I believe that a properly cured liquid styrene joint is stronger (at least less brittle) than a superglue joint.) The joint between the nosewheel strut and fuselage must be strengthened (with a pin), otherwise it could easily break off. I used a piece of piano wire (which upper end passed across the inside of the intake and was fixed inside the upper side of the intake, and lower end was inserted in the nosewheel strut).
The main undercarriage was added without problem, the correct angle of the main struts was guessed from the three-view drawings on the instruction sheet.
Canopy. Now I cut the canopy out. This was
accomplished with a tiny circular saw and
afterwards careful filing, sanding and dry-fitting. After a check that
it indeed fits well and the
inside of the cockpit is OK, it was glued to the fuselage with Humbrol
Clearfix (a non-fogging
cement for clear parts, which I have found to adhere pretty well even
to painted surfaces). One
tiny gap was filled with styrene filler (it didn't show from the
inside). After the joint had cured, I I
I masked the canopy with tape.
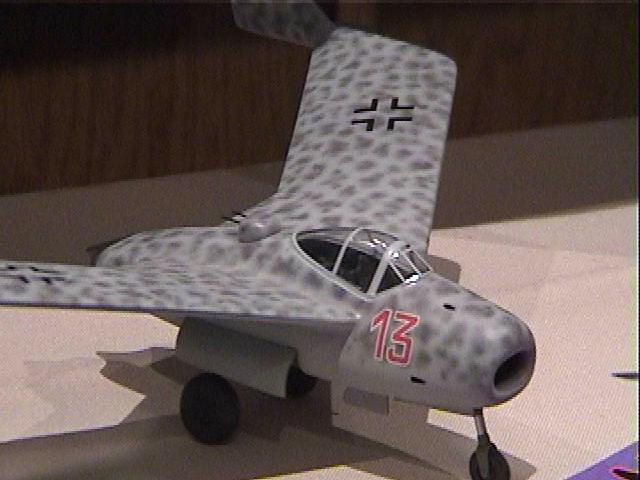
Painting and finishing. The appearance of the model improved significantly as soon as the first coat of paint was on :-) First, the whole model was painted overall RLM 76 (Humbrol 175 - this paint is now out of production, but - as Humbrol claimed - it was their exact match for the RLM 76). Then RLM 75 (Humbrol 125) mottling on the upper surfaces and tails was added. The undercarriage was painted RLM 02 (Humbrol 92 - I believe this has the greenish tint the RLM 02 had) and Aluminium (Humbrol 56 with dullcoat), and the tyres dark grey (Humbrol 67, AFAIR).
After painting, several coats of Future were brushed on for gloss finish under the decals. The very thin (made by Propagteam) kit decals were used for walkways and other markings, one swastika came from the Xtradecal 1/72 Luftwaffe WWII Swastikas sheet. (The kit's swastikas come in halves; I managed to assemble one on one tail, but the other quickly reduced to a small ball of wet decal mass...) The decals were applied with Humbrol decal softening and setting solutions and later fixed with another coat of Future.
Then all the model was dullcoated, to which subtle watercolour weathering was added. Finally, some delicate photoetch parts (painted also RLM76 (Humbrol 175)) were superglued to the model (a D/F loop under rear fuselage and an aerial under starboard wing). Two 12-mm lengths of 0.5-mm wire were added as the guns in the rear turret, and painted Gunmetal (Humbrol 53).
Final word. Certainly a buildable model, but the initial impression and moulding quality are somehow disappointing. Needs some work, but not too extensive. Accuracy - who knows?Who has seen the real thing?;-) but it's quite easy to make it look convincing. The decals are very thin but otherwise excellent (we're not speaking here about the policy of cutting some markings in two) and work well with the softening/setting solutions.
Should not be recommended as your first kit - you may get
disappointed in the hobby... ;-)
Requires some patience, but the result is nice.
e :- Czechmaster also produced a resin kit of this which is average - not sure if this is available also - William
Special Hobby
Fraser Gray
Military In Scale April 1996
When I first walked into Hannants' Model Shop, I could not
have
envisaged that I would be
leaving an hour later with two aircraft kits, as my main interest is
armoured vehicles. I fell for the
oldest marketing trick in the book, a pretty picture on the box top. In
this particular case it was a
striking nocturnal scene of a German experimental jet completing a
devastating attack run on two
Mosquitoes, the strange craft illuminated by the glow of the blazing
wooden wonders!
The kit that caught my attention is produced by a Czech
Republic
company, Special Hobby, and is
marketed in two versions, the Blohm & Voss P.215.01 fighter (sic)
and the 02 Nachtjäger.
Salesman Clifford persuaded me to buy both versions! which as you will
later read, was just as
well. I decided to model the three-seater night fighter, which is a
substantially larger aircraft than
the single seater variant. Whenever I start a model project I like to
obtain as much information on
my subject as possible. I am sorry to say I was unable to find any
information on this particular
aircraft so I had to rely on the brief history given on the instruction
sheet, which states the 02 was
a design project to increase the performance of the single seat
fighter. Apparently, five versions
of the fighter were constructed by Blohm, & Voss but were never
flown in combat. Further
research into this strange aircraft at a secondhand military book shop
gave me an insight into the
world of book collecting.
I was advised by the shop owner to look for the out-of-print
book
German Jet Genesis, the
proprietor told me he knew of the book being traded amongst dealers for
a hundred pounds plus,
I'm not sure if he was talking up the price but I decided to give it a
miss!
Back to the model, the kit's contents give the impression of a
vintage Airfix collector's kit from
the 1960s with thick runners and excessive flash. This poor impression
is not helped by the
instruction sheet, which appears to be an A4 photocopy. Obviously
Special Hobby invested their
budget into the striking box top artwork and presentable box. However
careful inspection of the
kit's components will reveal finely engraved panel lines which would
put most Japanese kits to
shame.
Construction commences with the cockpit interior. I assembled
the
floor and bulkheads, but
omitted the seats to facilitate painting. The control column is over
scale so I fashioned a
replacement from fuse wire and scrap plastic. I also replaced the
pilot's foot pedals as they did
not match the finesse of their photo etched detail parts. When I dry
fitted the assembled pilot's
office into the fuselage sides I discovered that part B5 intrudes into
the nose intake aperture, so I
replaced it with one cut from thin plasticard. I also cut an extra
dummy bulkhead and cemented it
in front of part B4 to hide a lead weight which is vital to prevent the
completed model from
tipping back on its tricycle undercarriage. The fit of the cockpit
interior is disappointing and
required extensive filling. I carried this out after I had cemented the
fuselage and interior
together, with Milliput smoothed into place with a damp paint brush.
The fuselage join seams
were carefully sanded to avoid damage to the panel engravings, where
damage had occurred I
rescribed using a Tamiya scriber. On checking my work I was surprised
to see that the
manufacturer had omitted the top cannon port which appears on the nose
cowling's centre line.
With reference to the box top artwork and the instruction
sheet's
four view plans I carefully cut
the port into the model. There also appears to be mould damage to the
other cannon port, which
I cleaned up with a scalpel blade.
I then turned my attention to the wings. When I had cemented
the
wing halves together, a design
fault in the kit's production revealed itself. The wing roots are open,
offering the smallest surface
for attachment to the fuselage. With the vertical stabilisers added I
am sure the wings would soon
fall off! Worse still, when dry fitted to the fuselage the dihedral is
far too acute, when compared
to the four view drawings. To overcome this problem I filled each wing
root with Milliput.
When the putty had set to a rubber state I pushed a thick peg of
plastic card into the curing filler
to provide a cutting guide. It is necessary to position the support
pegs towards the trailing edge
of the wing, any further forward and it would intrude into the cockpit
tub. When the Milliput had
set, I cut the appropriate holes and superglued the pegs into place,
which were matched to
location slots cut into the fuselage sides. I then taped the fuselage
to a mirror which offers a firm
flat surface, checking the fuselage was at right angles to the mirror.
(In the UK and Ireland
there's a reusable paper-tacking putty called Blu-Tack which I'd have
used instead of tape.
(Ahem. London call-girls use it to wallpaper 'phone boxes with their
ads. Don't ask how I
noticed: it's impossible to miss!) I don't know the US or Australian (same-
William
Moore)equivalent but it doesn't seem to harm styrene plastic,
though leaving it in place for
several days or in contact with a painted surface would certainly mean
all bets were off.
Anyway, after use I always wash unpainted plastic with a detergent
solution, just in case it
affects paint adhesion. It hasn't yet. PM ) Four card supports
were then cut to the angle of
dihedral shown in the kit's drawings and I used these to support the
wings as they were tacked in
place with superglue. With the weight of the wings supported by the
plastic pegs (and the card
supports, presumably. PM) the gaps at the junction of the wing and
fuselage were filled with scrap
plastic and superglued to provide a strong bond at the correct
dihedral. (I'd have used gap-filling
cyanoacrylate and an accelerator. PM) When the wings had set
firmly, I cemented the vertical
stabilisers to the wing tips, again checking they were square to the
fuselage. Extensive filling is
required to blend the stabilisers into the wingtips. Next I painted the
interior of the nose part A3
and the bulkhead matt black and attached it to the fuselage, sanding it
to flow into the contours of
the front of the aircraft. At this stage I airbrushed the exhaust cones
gunmetal and the venturi of
part A4 a lighter silver to suggest the effects of heat. When I had
assembled the exhaust
components each of the exhaust apertures was filled with Humbrol
masking fluid to protect the
paintwork. (For large areas I use tissue paper (oh, all right, loo
roll or TP, since it's got by far
the finest texture; just listen to the ads on TV!) wetted down into a
sort of papier-mâché. I leave
liquid masks for the really fine stuff. PM) Again extensive
filling and sanding was required to
achieve a smooth join to the fuselage, rescribing any damage to the
panel lines. The striking
symmetry of the unusual fighter was beginning to take shape!
The components for the tricycle undercarriage were removed
from the
sprues and required
cleaning up as the detail is indistinct. Each undercarriage leg is
supplied in two parts, the joins of
which require drilling and pinning with fuse wire. It is vital a strong
join is achieved as these
fragile components have to support the weight of the model and lead
counter balance.
Special Hobby have omitted location holes for the fuselage
undercarriage legs. I calculated their
position from the undercarriage legs and drilled location holes into
the fuselage wheel wells. I
also drilled a location hole in the nose wheels well and cemented a peg
to strengthen the join for
the nose wheel. I must say this part of the kit's production is very
poor, if you followed the kit's
instructions I am sure the model would soon collapse on its
undercarriage!
The kit's wheels again, seem to have suffered mould damage and
I
decided to replace them with
items from the True Detail wheel sets. I found the best match by using
set 72013 Heinkel 219
and set 72027 Ju-88 A4-A6. The replacement wheels are very impressive
and are bulged to give
an impression of the weight of the aircraft they are supporting.
Further improvements can be
carried out by thinning the undercarriage doors to improve the scale
effect.
The undercarriage was airbrushed with a mixture of silver and
gray,
the tyres painted a dark gray
with black hubs and set aside for final assembly.
Having had enough of drilling and filling for the time being,
I
decided to paint the pilot's office
following the instruction sheet's suggestions. I painted the seats and
attached the superb
photoetched seat belts to the back of each chair. The belts were
painted khaki and when dry were
pushed into place with the end of a paintbrush producing a crisp clean
edge. I was disappointed
to find that the turret gunner has not been supplied with a seat belt.
As this omission would be
visible through the cockpit glazing I decided to use the etched set
from the fighter version which I
had also purchased. I was amazed to find the same etched set for two
seats had been supplied for
the single seat fighter, so I had my spare seat belt without spoiling
the other kit. (There's a note
about this in the Me-262 3-seater review: the double-belt fret seems
standard to all Special
Hobby kits. PM) With the seats installed I added a gunsight built with
reference to the box top
art, completing the cockpit interior.
The canopy is an unusual component, as it is supplied as a vacuum formed part. I took great care in removing it from the waste plastic and when I dry fitted it to the fuselage I found it was too big, producing an ugly lip where the glazing joined the fuselage. It appears, whoever produced the moulding for the canopy, did not take into account the thickness of the plastic. Checking all the cockpit components were secure I attached the canopy with small amounts of epoxy resin glue, when I was sure the canopy was in the correct position I then built up layers of epoxy glue to hide the lip which the oversized canopy had created. I then masked the canopy with Tamiya masking tape to protect it and then carefully sanded the canopy join seam with fine wet and dry paper. To finish the job I used Milliput and a damp paintbrush to blend the join into the fuselage. At last the model was ready for painting. I decided to paint the exhaust section first, which was airbrushed in aluminium. When I had masked the metallic area with Tamiya masking tape the entire model was airbrushed a light gray. I had to mix this colour by gradually adding minute quantities of blue and black to a can of Humbrol matt white with reference to the colour swatches in the Monogram painting guide to German aircraft by Merrick and Hitchcock, as the correct shade is not produced by any manufacturers. (Is this still true? PM-This is one of those thorny issues - At a guess it may be RLM 77 which was being originally used as a marking colour for the codes on planes like the He 219 .This company seems to believe it may have eventually been used as a camoflage colour .It may also possibly be RLM 75 when used at scale lightness , it's such a minefield and everyone seems to have their own opinion - RLM 77 is not available but Aeromaster Primer Grey is supposed to be a match , most other RLM colours are available in specialist ranges like Xtracolour and Aeromaster - William Moore ) The painting guide is a comprehensive book and gives actual paint swatches together with instructions on mixing paint to achieve a correct scale effect. I have not seen this book in the book stores for some time, and I expect it has gone to join Jet Genesis on the collector's list.
(My copy cost me $300 Australian {$120 Pounds or $220 US } 12 months ago and I already see it being offered for $350 - William Moore)
I completed the camouflage by airbrushing on the disruptive
grey
spots using photographs of
various German nightfighters for reference. Once the paint had dried I
airbrushed through various
paper masks a grimy brownish black to represent fuel and cannon smoke
emissions. (Possibly
after drilling a pair of cannon-ports to indicate the Schräge
Musik installation...? I'm also
considering, when I get around to building mine, replacing the little
twin-gun turret with the
proper FHL-151 barbette as shown in Luftwaffe Secret Projects and
Reichdreams Dossier 15.
PM)
I emphasised the panel lines by running a fine propelling pencil lead along the panel lines.
( Personally I hate this as it is way OTT for 1/72 scale and makes it look like a Russian tractor- WM ) Completing the weathering, Humbrol Gloss Cote was airbrushed over the various parts of the model where decals were to be applied. I spent a tortuous evening applying the red 'no step' markings so great care should be taken with these decals. It was with relief I applied the jet's richly deserved call sign (Red 13, as you might expect. PM) With a coat of Humbrol Matt Cote I had completed the kit.
With echoes of post war jet development, the model is striking
when
constructed. However the
many small problems which I encountered during construction have given
me a poor impression
of this manufacturer. I am sure many aircraft enthusiasts are asking
themselves, 'what is he
complaining about?' I would say that 'faction' kits of such an unusual
subject will have a wider
appeal than generally enjoyed by aircraft kit releases, and as part of
this new audience I feel
Special Hobby have perhaps wasted a golden opportunity to expand their
market. Now where is
that Panther tank kit...? -